Posts


Hosting multiple node sites on Scaleway with Nginx and Lets Encrypt

Two years ago I wrote a blog post about hosting Node.js servers on Scaleway. I have now started using Nginx to allow me to host multiple sites on one €2.99 a month server.

This tutorial will help you build a multi site hosting environment for Node.js servers. We are going to use a pre-built Ubuntu server image from Scaleway and configure Nginx as a proxy. SSL support will be added by using the free letsencrypt service. I have written this post to remind myself, but hopefully it will be useful to others.

Setting up the account

  1. Create an account on scaleway.com – you will need a credit card.
  2. Create and enable SSH Keys on your local computer, scaleway have provided a good tutorial https://www.scaleway.com/docs/configure-new-ssh-key/. It's easier than it first sounds.

Setting up the server

Scaleway provides a number of server images ready for you to use. There is Node.js image but we will use the latest Ubuntu image and add Node.js later. At the moment I am using VC1S servers which is a dual core x86.

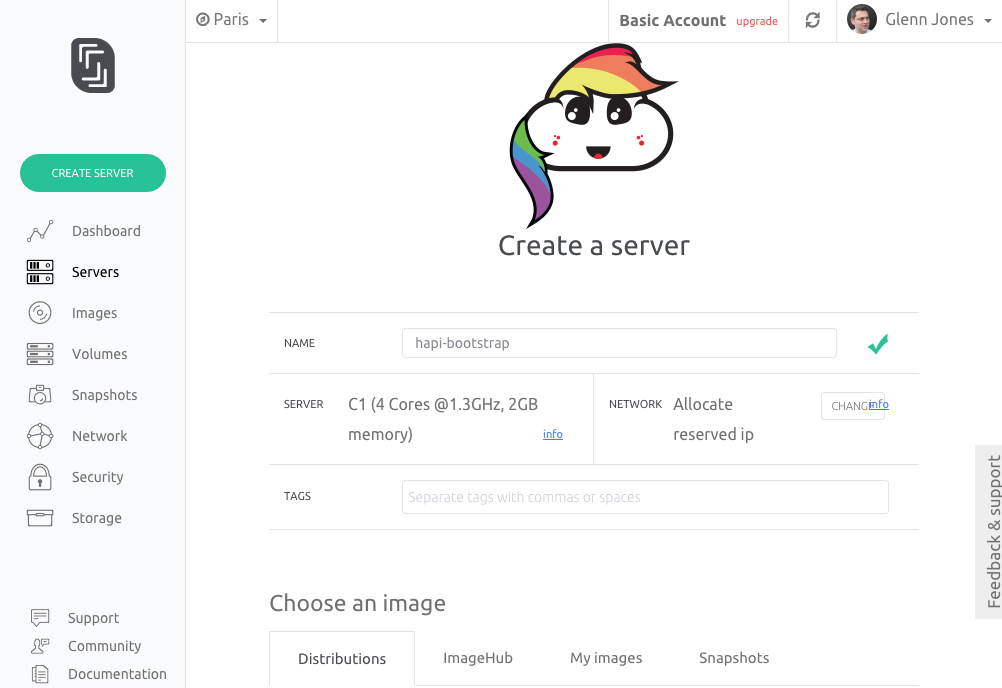
  • Log into the Scaleway dashboard and click “Create server”
  • Select the VC1S server and the latest Ubuntu image currently Xenial.
  • Finally click the "Create Server" button.
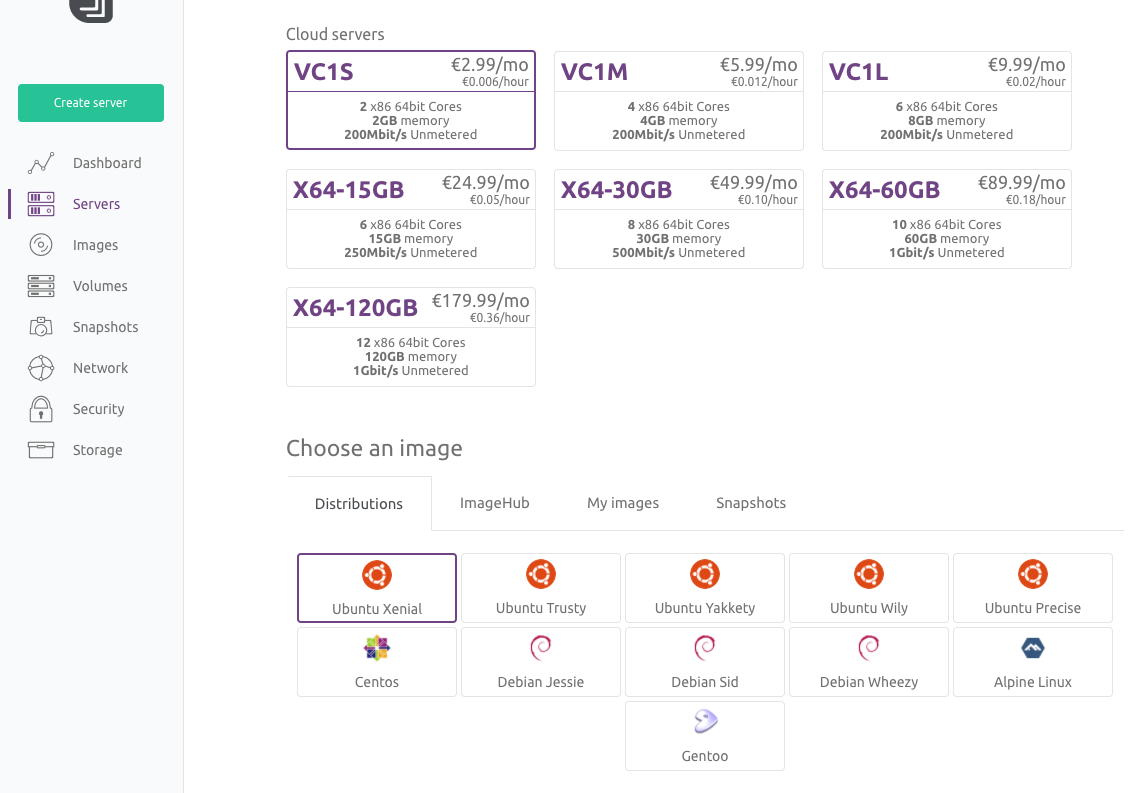
Image of scaleway dashboard
  1. Within the scaleway dashboard navigate to the "Servers" tab and click "Create Server".
    1. Give the server a name.
    2. Select the VC1S server and the latest Ubuntu image currently Xenial.
    3. Finally click the "Create Server" button.

It takes a couple of minutes to build a barebones Ubuntu server for you.

Logging onto your Ubuntu server with SSH

  1. Once the server is setup you will be presented with a settings page. Copy the "Public IP" address.
  2. In a terminal window log into the remote server using SSH replacing the IP address in the examples below with your "Public IP" address.
    
    $ ssh root@212.47.246.30
    
    If, for any reason you changed the SSH key name from id_rsa remember to provide the path to it.
    
    $ ssh root@212.47.246.30 -i /Users/username/.ssh/scaleway_rsa.pub
    

Installing the Node.js

We first need to get the Node.js servers working. The Ubuntu OS does not have all the software we need so we start by installing Git, Node.js and PM2.

  1. Install Git onto the server - helpful for cloning Github repo's
    
    $ apt-get install git
    
  2. Install Node.js - you can find different version options at github.com/nodesource/distributions
    
    curl -sL https://deb.nodesource.com/setup_6.x | sudo -E bash -
    sudo apt-get install -y nodejs
    
  3. Install PM2 - this will run the Node.js apps for us
    
    $ npm install pm2 -g
    

Creating the test Node.js servers

We need to create two small test servers to check the Nginx configuration is correct.
  1. Move into the top most directory in the server and create an apps directory with two child directories.
    
    $ cd /
    $ md apps
    $ cd /apps
    $ md app1
    $ md app2
    
  2. Within each of the child directories create an app.js file and add the following code. IMPORTANT NOTE: in the app2 directory the port should be set to 3001
    
    const http = require("http");
    const port = 3000; //3000 for app1 and 3001 for app2
    const hostname = '0.0.0.0'
    
    http.createServer(function(reqst, resp) {
        resp.writeHead(200, {'Content-Type': 'text/plain'});
        resp.end('Hello World! ' + port);
    }).listen(port,hostname);
    console.log('Load on: ' + hostname + ':' + port);
    

NOTE You can use command line tools like VIM to create and edit files on your remote server, but I like to use Transmit which supports SFTP and can be used to view and edit files on your remote server. I use Transmit "Open with" feature to edit remote files in VS Code on my local machine.

Running the Node.js servers

Rather than running Node directly we will use PM2. It has two major advantages to running Node.js directly, first is PM2 daemon that keeps your app alive forever, reloading it when required. The second is that PM2 will manage Node's cluster features, running a Node instance on multiple cores, bringing them together to act as one service.

Within each of the app directories run

$ pm2 start app.js

The PM2 cheatsheet is useful to find other commands.

Once you have started both apps you can check they are running correctly by using the following command:


$ pm2 list
The result should look like this: Image of PM2 list output

At this point your Node.js servers should be visible to the world. Try http://x.x.x.x:3000 and http://x.x.x.x:3001 in your web browser, replacing x.x.x.x with your servers public IP address.

Installing and configuring Nginx

At this stage we need to register our web domains to using the public IP address provided for the Scaleway server. For this blog post I am going to use the examples alpha.glennjones.net and beta.glennjones.net

Install Nginx


$ apt-get install nginx

Once installed find the file ./etc/nginx/sites-available/default on the remote server and change its contents to match the code below. Swap out the server_name to match the domain names you wish to use.


server {
    server_name alpha.glennjones.net;

    location / {
        # Proxy_pass configuration
        proxy_set_header X-Forwarded-For $proxy_add_x_forwarded_for;
        proxy_set_header Host $http_host;
        proxy_set_header X-NginX-Proxy true;
        proxy_http_version 1.1;
        proxy_set_header Upgrade $http_upgrade;
        proxy_set_header Connection "upgrade";
        proxy_max_temp_file_size 0;
        proxy_pass http://0.0.0.0:3000;
        proxy_redirect off;
        proxy_read_timeout 240s;
    }
}

server {
    server_name beta.glennjones.net;

    location / {
        # Proxy_pass configuration
        proxy_set_header X-Forwarded-For $proxy_add_x_forwarded_for;
        proxy_set_header Host $http_host;
        proxy_set_header X-NginX-Proxy true;
        proxy_http_version 1.1;
        proxy_set_header Upgrade $http_upgrade;
        proxy_set_header Connection "upgrade";
        proxy_max_temp_file_size 0;
        proxy_pass http://0.0.0.0:3001;
        proxy_redirect off;
        proxy_read_timeout 240s;
    }
}

Test that Nginx config has no errors by running:


$ nginx -t

Then start the Nginx proxy with:


$ systemctl start nginx
$ systemctl enable nginx

Nginx should now proxy your domains so in my case both http://alpha.glennjones.net and http://beta.glennjones.net would display the Hello world page of apps 1 and 2.

Install letsencrypt and enforcing SSL

We are going to install letsencrypt and enforcing SSL using Nginx rather than Node.js.

  1. We start by installing letsencrypt:

    
    $ apt-get install letsencrypt
    
  2. We need to stop Nginx while we configure letsencrypt:

    
    $ systemctl stop nginx
    
  3. Then we create the SSL certificates. You will need to do this for each server, so twice for our example:

    
    $ letsencrypt certonly --standalone
    

    Once the SSL certificates are created. You should be able to find them in ./etc/letsencrypt/live/

  4. We then need to update the file ./etc/nginx/sites-available/default to point at our new certificates

    
    server {
        listen 80;
        listen [::]:80 default_server ipv6only=on;
        return 301 https://$host$request_uri;
    }
    
    server {
        listen 443;
        server_name alpha.glennjones.net;
    
        ssl on;
        # Use certificate and key provided by Let's Encrypt:
        ssl_certificate /etc/letsencrypt/live/alpha.glennjones.net/fullchain.pem;
        ssl_certificate_key /etc/letsencrypt/live/alpha.glennjones.net/privkey.pem;
        ssl_session_timeout 5m;
        ssl_protocols TLSv1 TLSv1.1 TLSv1.2;
        ssl_prefer_server_ciphers on;
        ssl_ciphers 'EECDH+AESGCM:EDH+AESGCM:AES256+EECDH:AES256+EDH';
    
        location / {
            # Proxy_pass configuration
            proxy_set_header X-Forwarded-For $proxy_add_x_forwarded_for;
            proxy_set_header Host $http_host;
            proxy_set_header X-NginX-Proxy true;
            proxy_http_version 1.1;
            proxy_set_header Upgrade $http_upgrade;
            proxy_set_header Connection "upgrade";
            proxy_max_temp_file_size 0;
            proxy_pass http://0.0.0.0:3000;
            proxy_redirect off;
            proxy_read_timeout 240s;
        }
    }
    
    server {
        listen 443;
        server_name beta.glennjones.net;
    
        ssl on;
        # Use certificate and key provided by Let's Encrypt:
        ssl_certificate /etc/letsencrypt/live/beta.glennjones.net/fullchain.pem;
        ssl_certificate_key /etc/letsencrypt/live/beta.glennjones.net/privkey.pem;
        ssl_session_timeout 5m;
        ssl_protocols TLSv1 TLSv1.1 TLSv1.2;
        ssl_prefer_server_ciphers on;
        ssl_ciphers 'EECDH+AESGCM:EDH+AESGCM:AES256+EECDH:AES256+EDH';
    
        location / {
            # Proxy_pass configuration
            proxy_set_header X-Forwarded-For $proxy_add_x_forwarded_for;
            proxy_set_header Host $http_host;
            proxy_set_header X-NginX-Proxy true;
            proxy_http_version 1.1;
            proxy_set_header Upgrade $http_upgrade;
            proxy_set_header Connection "upgrade";
            proxy_max_temp_file_size 0;
            proxy_pass http://0.0.0.0:3001;
            proxy_redirect off;
            proxy_read_timeout 240s;
        }
    }
    
  5. Finally let's restart Nginx:

    
    $ systemctl restart nginx
    

    Nginx should now proxy your domains and enforce SSL so https://alpha.glennjones.net and https://beta.glennjones.net would display the Hello world page of apps 1 and 2.

Letsencrypt auto renewal

Let’s Encrypt certificates are valid for 90 days, but it’s recommended that you renew the certificates every 60 days to allow a margin of error.

You can trigger a renewal by using the following command:


$ letsencrypt renew

To create an auto renewal

  1. Edit the crontab, the following command will give editing options

    
    $ crontab -e
    
  2. Add the following two lines

    
    30 2 * * 1 /usr/bin/letsencrypt renew >> /var/log/le-renew.log
    35 2 * * 1 /bin/systemctl reload nginx
    

Resources

Some useful posts on this subject I used
  • node.js
  • nginx
  • letsencrypt
  • hosting

Fullstack 2015 notes

Listed below are some of my favourite sessions from Fullstack 2015 conference. This post is a collection of links for when I am talking to someone about that speaker or project I cannot remember. SkillMatter have published videos, unfortunately only for people with a logon. The talks where of a high standard and I enjoyed the event. The one sad thing about Fullstack was the lack of diversity, which really needs to be addressed before its put on again.

Scaling Node.js Applications with Microservices

by Armagan Amcalar - video

Distributed peer to peer architecture for building microservices with Node.js.

  • cote.js “An auto-discovery mesh network framework for building fault-tolerant and scalable applications”

WebRTC Reborn

Dan Jenkins - video, slides

Great talk on where WebRTC is after 3-4 years. Includes discussion of the use of signaling servers.

Debugging your Node.js applications - tools and advice

Stewart Addison - video

Although this was a general talk about debugging Node.js, the interest element was IBM’s work with appmetrics and appmetrics-elk. There was also a nice intro into using heapdumps and chrome.

  • appmetrics A tools for monitoring resource and performance data form Node.js-based applications
  • appmetrics-elk A dashboard built using the ELK stack (ElasticSearch, LogStash and Kibana) using visualising data from appmetrics

Workshop: PM2 to manage your micro service app & Keymetrics to monitor them

Alexandre Strzelewicz - video

This was a workshop on now to use PM2 to run your Node.js applications. The speaker also showed the power of Keymetrics, a very polished UI for monitoring resource and performance data from Node.js. Keymetrics has good alerting/notification features. The background issue with both PM2 functions and Keymetrics prices is it seems to run against the move to container systems like Docker.

  • PM2 Production process manager for Node.js applications with a built-in load balancer for processor cores.
  • Keymetrics Monitor and orchestrate multiple servers with the same dashboard, built on top of PM2 to grab statistics from your applications.

Chrome DevTools Deep-dive

Addy Osmani - video

A look at performance profiling, JavaScript debugging and animation inspection in Chrome’s dev tools.

The Web Is Getting Pushy

Phil Nash - video, sildes, code

A demo of push notifications the standard version and with service worker. The demo also had some great walk throughs of the code needed for push notifications.

We fail to follow SemVer – and why it needn’t matter

Stephan Bönnemann - code, twitter

Stephen talked about the need for semantic releases and his work taking forward ideas from Angular commit message guidelines to an new auto versioning system used by Hoodie.

Surviving Micro-services

Richard Rodger - video, slides, code

For me the best talk of the conference, on how message-oriented systems can fail. Richard covered common failure patterns and methods for their mitigation. Its also an introduction to Seneca.js.

The Javascript Database for Javascript Developers

Mark Nadal - video

Mark gave talk on Gun a realtime, peer-to-peer graph database. It works in the browser and on servers with some interesting sync capabilities. It can also be use as an offline database like Pouchdb.

Civilising Bluetooth Low Energy: bringing BLE devices to the web

Jonathan Austin

A really interesting talk about Bluetooth Low Energy devices and thier future. Demo of chrome interacting with Bluetooth device.

Workshop: Developing Micro-services

Peter Elger

This was a workshop to build and deploy an example microservice system. It utilize a number of technologies including Node.js, Mqtt, Docker and InfluxDB.

  • fullstack2015
  • node
  • iot
  • javascript

Building a simple Node.js server on scaleway

This tutorial will help build a simple hosted Node.js server using scaleway in just a few minutes. We are going to use a pre-built server image from scaleway and a Node project from a Github repo. I have written this post to remind myself, but hopefully it will be useful to others.

Setting up the account

  1. Create an account on scaleway.com – you will need a credit card.
  2. Create and enable SSH Keys on your local computer, scaleway have provided a good tutorial https://www.scaleway.com/docs/configure-new-ssh-key/. It's easier than it first sounds.

Setting up the server

Scaleway provides a number of server images ready for you to use. The Node.js images is a little bit dated so we will use the latest Ubuntu image and add Node.js later.

screenshot of scaleway dashborad
  1. Within the scaleway dashboard navigate to the "Servers" tab and click "Create Server".
    1. Give the server a name.
    2. In the "Choose an image" section select the "Distributions" tab, page through the options until you can select the latest Ubuntu, currently "Ubuntu Vivid (15.04 latest)".
    3. Finally click the "Create Server" button.

It takes a couple of minutes to build a barebones Ubuntu server for you.

Logging onto your server with SSH

  1. Once the server is setup you will be presented with a setting page. Copy the "Public IP" address.
  2. In a terminal window log into the remote server using SSH replacing the IP address in the examples below with your "Public IP" address.
    
    $ ssh root@212.47.246.30
    
    If, for any reason you changed the SSH key name from id_rsa remember to provide the path to it.
    
    $ ssh root@212.47.246.30 -i /Users/username/.ssh/scaleway_rsa.pub
    

Adding Git, Node and your GitHub project onto the server

  1. Move into the top most directory in the server
    
    $ cd /
    
  2. Install Git onto the server
    
    $ apt-get install git
    
  3. Install Node.js - you can find different version options at github.com/nodesource/distributions
    
    curl -sL https://deb.nodesource.com/setup_4.x | sudo -E bash -
    sudo apt-get install -y nodejs
    
    apt-get install nodejs
    
  4. Install PM2 - this will run our Node app for us
    
    $ npm install pm2 -g
    
  5. Clone your Node repo from GitHub. The space and word "app" at the end of the command tells git to place the project contents into a new directory called "app"
    
    $ git clone https://github.com/glennjones/hapi-bootstrap.git app
    
  6. Move into the new app directory
    
    $ cd app
    
  7. Install Node packages
    
    $ npm install
    
  8. Setup the basic environmental properties. Note your app needs to use process.env.HOST and process.env.PORT to set its network connection
    
    $ export PORT=80
    $ export HOST=0.0.0.0
    $ export NODE_ENV=production
    

Running Node server

Rather than running Node directly we will use PM2. It has two major advantagaes to running Node directly, first is PM2 deamon that keeps your app alive forever, reloading it when required. The second is that PM2 will manage Node's cluster features, running a Node instance on multiple cores, bringing them together to act as one service.


$ pm2 start app.js -i 0

The -i 0 flag tells PM2 to run in cluster mode and use as many cores as it can find. The PM2 cheatsheet is useful to find other commands.

For feedback on the state of the server

  • List - $ pm2 list
  • CPU / Memory Monitoring - $ pm2 monit
screenshot PM2 list of clustered apps

View your running app in the browser

View your app from the "Public IP" in any browser


Other useful information

Updating app using Git pull

If you wish to update your app just log on to the server using SSH and use git pull
  1. SSH into server - $ ssh root@212.47.246.30
  2. Move into new app directory - $ cd /app
  3. Git pull latest code - $ git pull

Using a private GitHub repo

There are a few ways to pull a private GitHub repo using SSH keys from a remote server. I use the "Personal access token". You can generate these tokens in the settings area of GitHub and use git clone with this URL structure:

$ git clone https://{token}@github.com/glennjones/glennjones-net.git/ app

Saving server setup for later use

You can setup your own images based on your running server for easy deployment by using snapshot and image features of the service. I did this to create a basic Ubuntu 15 and Node 4 image for this project.

Performance

You will often hear Scaleway C1 servers being compared to the Raspberry Pi 2 in terms of spec, which makes you think it maybe slow. Using all 4 cores they seem perfectly fine for my personal projects. I have yet to find a good set of benchmarks against other services, which would be useful. This blog is running on scaleway as of (2015-09-30).

Mongodb Issue

Scaleway C1 servers and Mongodb do not play very well together. There is a version you can get to work, but it's not well supported or considered production level.

Solutions maybe to move db operations onto dedibox by the same company or use one of the Mongodb hosting services and live with some network latency.

More complex deployments

You can deploy much more complex setups with multiple Node servers, load balancers etc. I am very interested in trying out the Electric Search. At the moment building all this into images that you can deploy is quite complex for none devops people.

I am still playing with this service but so far its proved interesting and I have moved at least 5 of my small personal sites over.

  • scaleway node deployment

The problem with window.URL

I was working on a library where I needed to resolve a relative URL using a base URL with JavaScript in the browser. After googling I found the relatively new window.URL API documented on MDN. It allows you to create a URL object that returns a resolved URL, which was great, just what I needed!


var url = new URL('/test.htm', 'http://example.com');
console.log( url.toString() );  
// output is:  http://example.com/test.htm

As with all new API’s I don’t expect all the browsers to support them straight away, but that’s OK I can test for the existence of APIs such as window.URL and use a fallback or polyfill. The code should look something like this.


if(window.URL){
	var url = new URL('/test.htm', 'http://example.com');
	console.log( url.toString() );
else{
	// do something else – fallback or polyfill
}

In this case it does not work because the URL API is actually two overlapping specifications and designed in such a way to allow for one to break the other if they are not implemented together. This is because they both lay claim to the window.URL object. The two specifications are:

The problem

The IE team have implemented just the File API specification, which is not wrong in itself, but if you try use the URL object in IE10 as specified in the URL API specification it throws an error and stops the code execution. Testing for window.URL will not help you as it does exist in IE10 and IE11.

I don’t think IE throwing the error is the issue. Its more of a case of how did the wider web community design APIs that end up clashing?

The workaround

You need to write something like this:


// test URL object for parse support
function hasURLParseSupport (){
	try{
		var url = new URL('/test.htm', 'http://example.com');
		return true;
	}catch(e){
		return false;
	}
}

if(hasParseURLSupport()){
	var url = new URL('/test.htm', 'http://example.com');
	console.log( url.toString() );
}else{
	// do something else
}  

Not meeting expectation’s

Having done a bit of UX design in my time I would class this issue of one of not meeting developers expectations. At least to me using a try/catch block is not how I expect to have to deal with the implementation of new APIs. This should have been resolved at the API design stage before they became public in the browsers.

Wasting time

It took me quite a bit of research to work out what the issue was (2-3 hours) and come up with a small workaround I could trust. Mainly because I had to start reading the specifications and running browser tests.

Going forward

  • As IE10 will be with us for many years the only practical way to use the URL object will be to use more complex tests like the hasURLParseSupport above.
  • This issue should be recognized in the two specifications that lay claim over the URL object.
  • The places that provide documentation of the APIs like MDN should discuss the issue and provide code examples of workarounds.
  • The W3Ctag should review overlapping specifications in fine detail to provide advice on implementation at this level.

I may have got the above wrong

I would just like to point out I am just a web developer and not part of the specifications community that created URL APIs. It’s possible that I may have missed some element of the specifications that deals with this issue. I do not know about the whole history of the URL object and all the discussions of its design. Please let me know if any of the above is incorrect of or can be added too and I will change the post.

Links

  • url javascript api

The shoebox - a manifesto for transmat.io

Over the last couple of years I have been thinking about how we view each other through the web, the content we post and the interactions we have. Like many people, I am not happy with the path Facebook and Twitter are taking us on.

Rather than just get upset at the every increasing monoculture that is slowly distorting the early promise of the web. I want to help build a new type of relationship that we can all have with the web and these sites. These are the ideas that have directed me.

Shoeboxes and mementoes

When I was a child, my brothers and I all had a shoebox each. In these we kept our mementoes. A seashell from a summer holiday where I played for hours in the rock pools, the marble from the schoolyard victory against a bully and a lot of other objects that told a story.

We all collect mementoes of some sort, they are the stories that we use to define ourselves. These stories are not static things built in stone, but a living part of us. We often reshape them through time as our view of life changes or our memories colour them. They are also used in different combinations to weave the way we present ourselves to the different groups of people in our lives.

The webs idea of memory is not humanistic

Today large amounts of humanities online content is published on social networks. These sites seem to consider every bit of content/interaction to have the same level of importance. In a recent talk Maciej Ceglowski said:

The Internet somehow contrives to remember and too much and too little at the same time, and it maps poorly on our concepts of how memory should work
Maciej Ceglowski, beyond tellerrand 2014

The incumbent social networks seem unable to forget a single piece of content we give them, as it is required to power their business model of profiling us for advertising. At the same time we don’t have enough control within these spaces to curate our stories. To be able to group together those things that are important to us and subdue those that are not. I would like to build publishing environments that map to the way we keep mementoes and tell stories.

My presence on the web needs a new foundation

For me to rebuild a presence on the web I need to take back control of how I create, collect, distribute, store and publish my content. Only then can I curate a more personalized representation of myself.

Transmat

I have been working with a small group to build transmat.io, it:

  1. Collects digital content for publishing, it’s not just a file store.
  2. Has a content creation and collection interface that is designed for mobile first and for social content such as status updates and check-ins.
  3. Simple distribution tools that link pre-existing services, allowing you to control your own content while still being part of the conversation on social networks.
  4. Imports pre-existing archives from Twitter, etc.
  5. Provides a simple API allowing the reuse of content i.e. in blogs.
  6. Provides auto backup in HTML for longevity.

Transmat is just a foundation on which I am going rebuild my blog. It’s not a story telling tool in itself, it’s more like my online memory from which I can pull and weave content from.

I also hope Transmat and all its tools will help others collect and reuse their digital content so they can weave their own stories. If you’re interested why not sign up for an invite. https://transmat.io

  • transmat
  • indieweb
  • indiewebcamp

Playing with webmentions

I am just about to rebuild my blog to try and reclaim a bit of my digital life, before doing that I have switch on Matthias Pfefferle WordPress plug-in for WebMentions to see how it works.

Mentions:

Awesome :) Also, make sure you add a SubToMe button :) There is a WP widget so that people can follow you easily too.

@glennjones nice! I hope everything works fine. BTW you can use SemPress (http://notizblog.org/projects/sempress/) if you don’t want to update your whole theme by hand…

AppCache and SSL

UPDATED POST:

We have just hit a bit of an issue with AppCache whilst we were deploying a new version of a client site. It’s not really a bug, but more a lack of clarity in the current documentation and different implementations in the browsers.

It has taken me sometime to understand how the NETWORK: section of the AppCache actually works. In the end, I had to build a series of AppCache tests to figure it out.

The story

We setup the NETWORK: section of the AppCache to point at a rest API


NETWORK:
//example.com/api/*

# This code is an incorrect use of AppCache

Breaking AppCache

As we deployed our site we wanted to run the API that is on another domain under SSL. So we changed the URL in the NETWORK: section so it started with https and added the certificate to the site. i.e.


NETWORK:
https//example.com/api/*

# This code is an incorrect use of AppCache

At this point Chrome stopped making API requests, we were only initially testing with Chrome.

First mistake – putting the * wildcard in the wrong place

Our first mistake is that we wrongly added the * wildcard to the end of the URL. Each entry in the NETWORK: section can be one of three types. These entries are usually added as a new line directly under the NETWORK: section header. The entry types are:

  • * wildcard on its own
  • relative or absolute URL
  • URL “Prefix match”

Examples of the correct use of AppCache NETWORK: section


NETWORK:
/data/api/
https//example.com/api/
*

“Prefix match” URL

A “Prefix match” is a strange concept – it’s a URL that is used as a “starting with” matching pattern. If your API has many endpoints but they all live in the path http://example.com/api/ then that’s all you need to add to the NETWORK: section. The * wildcard can only be used on its own and means any URL.

Second mistake – URLs should have the same protocol and domain as the manifest

There are other rules that effect the use of URLs in the NETWORK: section. All URLs have to use the same protocol scheme i.e. http or https and be from the same domain as the manifest.

Browser implementations of these rules do differ, Firefox is strict and insists on the same domain, where as other browsers only insist on the same protocol scheme. See the test examples I have built to demonstrate this.

In effect, that means to get good support across the major browsers you can only use URLs in the NETWORK: section if they are to the same domain as the manifest.

The fix is to use the * wildcard and not URLs

The vast majority of sites sidestep the complexities of URLs, by just applying the * wildcard on its own i.e.


NETWORK:
*

This will work with the manifest on one scheme (http) and the API on another (https). The wildcard does not have the same rules as URLs.

You have to ask why the hell the authors of the specification added all this complexity if all that happens is that everyone applies the * wildcard.

Thanks to Jake Archibald for some pointers to the answers as I waded my way through this.

  • html5 appcache

Response Day Out Conference

I went to the Responsive Day Out event

Web and asset fonts

There were a number of good practical take aways from Richard Rutter, Josh Emerson and Andy Hume talks on web fonts. Josh’s talk had a couple of neat ways of progressively enhancing content with resolution independent icons stored as a web font. I particularly liked the use of a data attribute in the HTML and content attribute in the CSS in his code examples


// CCS
[data-icon]:before{
   content: attr(data-icon);
   font-family: 'Cleardings';
   speak: none;
}

// HTML

@clearleft

});

I also thought the use of ligatures to allow the replacement of words in your text with single icons was good. Take a look at the forecast.is example site Josh put together to illustrate the approaches he talked about.

Part of Andy’s talk on “The Anatomy of Responsive Page Load” covered the method the Guardian mobile site is using to load and cache its custom web fonts. It is a form of progressive enhancement, where only browsers that pass the following tests display the custom font:

The server then sends a base64-encoded font so it can be cached client-side in localStorage for reuse on further page requests.

Patterns of navigation

David Bushell took an in depth look at UI patterns use for navigation. He divided the common patterns found in current responsive design into five :

His talk finished with a useful list of considerations you should be focusing on when making responsive design choices about navigation.

For me one of the strongest points David made was all the ways someone can now interact with navigation i.e. mouse, keyboard, touchpad, touchscreen, stylus, voice, movement, remote and games-pads. True device independence is not just about screen size, a point massively reinforced in Anna Debenham’s talk. Her love of game consoles always heartens me and is a good antidote to those who consider the web a web-kit monoculture. Take a look at her console site its a great resource.

Progressive enhancement

Both Andy Hume and Tom Maslen have been involved in building large-scale responsive sites for the Guardian and BBC respectively. Their talks both focused around the practical use of progressive enhancement. Tom laid out the much talked about “Cutting the Mustard” concept from the BBC i.e. dividing user agents by modern functionality support.

The BBC’s core experience of HTML4 is delivered to all browsers, but an enhanced JavaScript experience is loaded onto any browser that supports the following:

  • querySelector
  • localStorage
  • addEventListener

I was impressed with the script loading optimisation the Guardian is using. Somehow the new async and defer properties for a script tag had passed me by.


This allows a script to load directly after the HTML at the same time the CSS is loading. They fallback to use appendChild(script) on browsers without support for these new properties. This support detection has to be done server-side.

Media queries (the future or not)

More than one speaker said that they expected their use of CSS media queries to reduce as we move through the next couple of years. I got the feeling that these comments are a mixture of a response to both an over fixation on this area of CSS, but also a belief that other elements of CSS will play a much larger part in creating fluid layouts in the future.

So it was interesting that Bruce Lawson’s talk about future standards development centered so heavily around new media queries that can target device types like touch and remote. This felt like a mixed message.

Things that where un-said

There are two topics I would really liked to have heard about. These are the two difficult subjects of display advertising and web apps vs responsive design

I thought the approach my friend Jeremy Keith took in sidelining the subjects and the people asking about them was not as productive as maybe getting speakers to hit the subject full on. To be fair these issues were most likely out of the scope of this event, but they will be the anchor around responsive design’s neck and they deserve a honest straight-up engagement.

Death of Photoshop and winging it

Sarah Parmenter started the day by being honest and saying she often feels she is just winging it while creating responsive web designs. Her comfortable and well-homed design processes of the past had been lost in the move to responsive design.

A few of the speakers also made reference to the fall from favor of the Photoshop centered design workflow. With some contempt being levelled at the idea of the ‘deliverable’, a Photoshop layout given to a client as if it were the end point in its own right.

I think both points are rooted in issues of client communication.

Photoshop has not been removed from our toolkit, just its output can no longer be the crutch by which we dumb down the way we communicate complex design problems to our clients.

This new world of thousands of device formats and usage contexts means we have to draw clients more fully into the design process with all the subtle and complex trade offs involved in resolving a responsive design.

I am sure Sarah is not winging it; just like most of us feeling the uncomfortable uncertainty that always comes with change.

Thanks

The event was a thought provoking day of responsive web design. Even if I have not mentioned all the speakers, they all did a great job. Thanks to Jeremy and Clearleft for putting on the event. The day was split into groups of 3 speakers all doing a 20 minutes slot with a small joint Q&A session together. A good format I hope they will use again.

Speaker’s slides

Speaker’s notes

Audio recordings of talks

Write ups by other people:

  • Events
  • design
  • progressive enhancement
  • responsive design
  • web fonts
Mentions:

Thanks for the write-up, Glenn.

On the subject of advertising, I thought we did tackle that reasonably well (although briefly) during the Q&A, particularly from Elliot.

As for “web apps”, my pushback was serious: come up with a definition of the term that we can all agree on, and then we can discuss it. But until then, I don’t see what value there is in creating an artificial divide (that nobody can agree on) between some websites and others. Why do we need that distinction? (serious question)

Also, Paul and Mark did address the question in the Q&A, even if it wasn’t as in-depth as you would’ve liked. The whole day was very quick-fire so no one topic was getting dwelled on for particularly long.

Brand new microformats 2 parser

I have just released a brand new microformats 2 parser for node.js. You maybe thinking microformats are so 2006, but this is new. Hear me out…

Demo API /> http://microformat2-node.jit.su/

Try the API with: /> http://the-pastry-box-project.net/ /> http://microformats.org/

New life in the semantic web

A lot has changed in the last couple of years; the search engines have started to use semantic mark-up to improve their listings. Google’s rich snippets feature has created a secret army of SEO people who are quietly marking up big parts of the web with semantic data. Not that there are not already billions of microformats on the web.

HTML5 created a third standard of semantic web mark-up to add to the mix of RDFa and microformats. Then the search engines clubbed together and brought us schema.org. After a few catfights between the standards supporter clubs, these events have brought us a small rebirth of the semantic web.

microformats 2

The microformats community has revisited it’s standard and come up with “microformats version 2”. At first, I thought why! I don’t like change unless it gives me something worthwhile. After reviewing the work, I think the wholesale change to a new version of microformats is worthwhile because:

  1. The authoring patterns have been simplified even more and they are based on real life use cases e.g.: Glenn Jones is a valid microformat
  2. />

  3. microformats 2 addresses one of the biggest problems in maintaining microformats in real sites. The class names are now prefixed i.e. class=”fn” is now class=”p-name”. The prefixes like “h-*” and “p-*” tells you a class is a microformat property and helps make sure classes are not moved or deleted by mistake
  4. />

  5. Like microdata, microformats 2 now has a full specification for a JSON API. This is important as it means the parsers should now have the same output and also browsers could implement this API.

New parser and test suite

Most importantly for me I wanted to help move forward microformats, I liked the fact that the API design aligned microformats 2 a little closer to microdata and RDFa. So I have invested a couple of months of my time to building a brand new JavaScript parsing engine and a comprehensive test suite.

microformat-node GitHub https://github.com/glennjones/microformat-node /> Test Suite GitHub https://github.com/microformats/tests

I have just open sourced a new version of microformat-node using this parsing engine. Soon I will create a browser compatible version of the engine and update the microformat-shiv library which powers browser plug-ins etc.

The test suite took a long time to develop, but should provide an excellent starting point for anyone else who wants to develop a new microformats 2 parser. I know Barnaby Walters has already started working with it for his php-mf2 parser.

I hope this work will help microformats and the concept of the semantic web move forward another little step. Enjoy

  • Microformats
  • node.js
  • Projects
Mentions:

Ho nice! We’ve been *wanting* to add support for hAtom for years now… but this may be the right trigger!

Excellent Glenn!

So, who is actually using microformats version 2? If nobody then what is the point of converting my website to something that will break what is current there (microformats version 1)?

Instead, why not wait for HTML 5 to be ratified, and then convert to Microdata. Microdata is supported by W3C, and so will win in the marketplace. Microformats are a dead end.

Regards, /> Bogus

To Bogus Name

The semantic web is a bit of a mess at the moment, three standards to do one thing. For the record W3C are actually supporting the development of both Microdata and RDFa. Microformats are still hugely popular, with 70% of all structure data domains in 2012 according to the Web Data Commons.

With any new format, adoption is always a chicken and egg situation. I think that microformats 2 has some very good qualities which are worth supporting and encouraging. As a developer I can do that by providing the tools for people to take something conceptual and use it for real.

The web community has not done a very good job of joined up effort with the semantic web. What is heartening is to see how all three standards are starting to converge a little, through the efforts of people like Manu Sporny and others.

I would not wait W3C to sort out which standard will win out, it will not happen. The three standards will continue to develop, pulling from each other.

In the end I am never get to tie to individual standards just to the ideas and concepts that drive them. Building this parser is a much about seeing if ideas behind microformats 2 supply the best mix of ‘easy of authoring’ and flexibility in what date can be described. Something all three standards have tried to balance in the past, but just misses the mark.

So no it brand new standard no one is using it just yet, a bit like HTML5 was then that first started and no and microformats are not dead end.

Regards, /> Glenn

Thanks for the good work. I have been think of creating a new microformat to representing tourist attractions. How can i create a parser to process the new microformat?

Glenn, this is AWESOME!

I’ve tried a whole bunch of pages with microformats2 with your parser and it works really well.

A few clarifications from “Bogus”‘s post: /> * You can use both microformats2 and microformats1 simultaneously no problem. /> * It’s going to be years before “HTML 5 [is] to be ratified” – but that’s no reason to not to use it. /> * As Glenn points out, W3C has many ways of marking things up: microdata, RDFa, microformats are all listed on w3.org/html5 in the “Class: Semantics” section. W3C also uses microformats on their events pages, and in numerous specifications to markup the authors/editors and other information. /> * There’s a lot of microformats2 use in the wild – the spec links to a few of them.

But what’s particularly great is that Glenn’s microformats2 parser fully supports the well-adopted “original” microformats, so e.g. to Julien Genestoux’s point, clients and sites can use the parser to consume hAtom, which is incredibly well deployed across the web (every WordPress blog and more).

Once again, thanks again for your awesome work Glenn, on both the microformats2 parser and the test suite.

-Tantek

In full agreement with Tantek, this is awesome.

NodeCopter Brighton & kinect-drone

Last weekend I attended NodeCopter Brighton, a day of hacking AR-Drone’s and node.js. I wanted to control the drone by hand jestures using the Kinect’s motion detection abilities.

Links to the high-res versions (.mov, .mp4 or .ogv) of the video

Hackdays are funny, sometimes everything comes together, other times small things just trip you up. Unfortunately Saturday was a day when nothing seemed to work for me, mainly because I made the mistake of loading the wrong version of a USB driver.

On the upside that day I bumped into Aral getting coffee at Taylor St who pointed me to a project he did using Kinect with processing.

So after a couple of hours of hacking after the event, I could wave my hands and fly a drone. Once I had the right USB driver installed.

Thanks to everyone who made the day possible, I had a great time. I am glad with others, Madgex was able to sponsor the event.

You can download the project from github kinect-drone, enjoy

  • JavaScript
  • node.js
  • ar-drone
  • drone
  • nodecopter

Data formats:

API